This post (and the next) won't have as much commentary, because I explained how to draw animals in my last post. This post builds upon that one, pointing out some specific things to be aware of when drawing dogs.
If you're a new artist, or just want to find some fun new tools or programs to work with, check out my traditional art supply and digital art program recommendations. So, let's get started!
How to Draw Dogs Pt. 1: Paws, Eyes, and Noses
Art Type: Traditional or Digital
I'm Using: MyPaint and an Intuos 4
Today I'm going to cover some more detailed aspects of dogs: their paws, eyes, and noses. Just because these are smaller details doesn't mean that they are insignificant. People love dogs' cute noses, big paws, and sympathetic eyes, and if you can draw them well, you'll increase the appeal of your dog art.
To understand dog paws better, you really should take a look at the underlying anatomy. I once spent a full week just drawing dog skeletons and skeletons with muscle, and it helped me tons. I now understand more of the little things, like why dogs' bodies have some of the angles and insets that they do. In particular, I learned how paws are set up, which allows me to place the joints and nails more accurately.
Let's take a look at some paws that I drew (blocking on the left, finished sketch on the right). Here are some things to keep in mind: #1- Paws are different shapes. Some are long and flat, some are compact and taller. This will vary depending on what the breed was created to do. Back feet tend to be smaller/more compact than front feet. #2- Claws are short nails, of which the middle two point inwards. Don't make them too long or pointy. Dogs' nails tend to be kept clipped in order to give them better traction on hardwood floors. #3- The way a dog's foot looks when he's standing is somewhat different from when he's lying down. Notice how the paw toward the bottom of the sketch page looks curled in more when in the lying pose. This is the result of muscles.
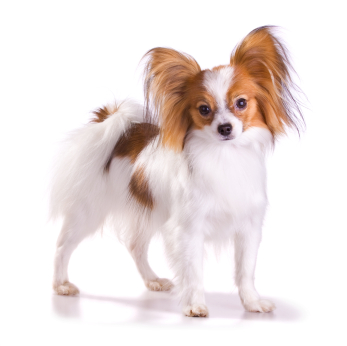
Now let's look at some noses. Dog noses tend to be universal in shape, though they may vary in width and nostril size. They can also vary a bit in color. Look at the nose of a Papillon versus that of a Chesapeake Bay Retriever . Same shape, different colors.
Papillon (black nose)
Chesapeake Bay Retriever (brown nose)
Lastly, take a look at the eyes of some dogs (sketches above). These vary a lot and will change what you first think of a dog. Big round eyes make you think they're big sweethearts, slanted eyes make them look more intelligent, and squarer eyes make them look slower and sleepier. Eye color also varies. You'll have a different reaction to a dog with dark brown eyes than to one with shocking blue eyes. If you're designing a dog character, these are important things to keep in mind.
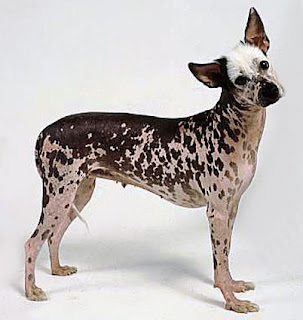
Reccomended Reading: The New Encyclopedia of the Dog is the reference I've used for all the drawings I made for this two-part tutorial. It's not a drawing book, but it's my go-to reference for all things dog. But you're probably wondering, can't I just Google dogs and get my references and discover fun breeds? Well, you can. But I find that when I Google I tend to get distracted, especially by cute puppy pictures. With this book I can get right to work, and don't have to search around trying to find a proper face angle reference. On top of that, it's easy to flip through it to find interesting new breeds. Lots of people draw Huskies. But how many draw Peruvian Inca Orchid dogs? This book can help you become a more unique dog artist.
Peruvian Inca Orchid Dog
Next time I'll discuss dog's faces and bodies, so you'll be able to apply what you learned about these details. In the meantime, search for more dog pictures, and see if you can notice the subtle differences in eye and paw shapes. You might also want to see if you can apply what you've learned to dog ears. Up ears can be simplified down to simple triangles, but they have so many interesting shapes that they can be very fun to draw realistically. The same goes for floppy ears. Take a look at some photos and find some fun shapes. Then try to capture those shapes in your drawings.Until next time!


Wonderful site! I am 83 years old and started sketching "kids with fur coats", I am currently working on an Akita who is a magnificent animal. I am doing him from a photo, where he is lying down. In the photo it looks like his right paw is bent under at the first joint. It doesn't show in the picture but from what I see of the portion of the leg that is what seems to be happening. I would like to know just how to sketch it. Thank you.
ReplyDeleteHi! I'm glad you like my site! For your Akita drawing, I would just draw it like you see it. If the area is especially tricky, you could draw a grid over the photo and a grid over your drawing (draw it lightly so you can erase it later). Then just compare the placement of areas in the photo grid and copy that over to your drawing's grid. I hope that helps!
ReplyDelete